As you know, I made this sourdough starter a couple of months ago. After baking two underwhelming loaves of bread, I forgot about it for a while in the refrigerator. Since I really didn't feed it at all in October or most of November, I was a little afraid of even opening the lid. When I finally worked up the courage, I found a grayish watery substance on top that looked dead and swampish. However, I was assured by the internet that this is perfectly normal and went ahead and poured off the top liquid, gave the starter a stir, and fed it according to the instructions in the Bread Baker's Apprentice -- 1 cup starter to 4 cups flour and 2 1/2 cups water.

We experimented with the scalloped edges vs. smooth and the vote was unanimous in favor of scallops. The edges got a little crispy in the oven, which was a great contrast to the sourdoughy chew. I'm definitely going to try these again very soon to see if my folding technique improves the already great-tasting treats.
Yesterday I was determined to make this bread submit (rise) in time to have it before bed. In my rush to get it proofing before picking Miles up from our nanny share, I did something stupid. I left my KitchenAid mixer running on the countertop for less than 30 seconds while checking out the next steps in my cookbook and BAM! It somehow walked its way off the countertop and onto the floor. Luckily, the dough was almost finished kneading and looked ready to go.
I set the dough to rise on the warm oven for three hours and contemplated the fate of my poor mixer. From what I can tell, the cord took a brunt of the force and came nearly completely out of the back of the motor. Today, one of my tasks after taking Miles to his one-year checkup is to call around and find a repair shop so the KitchenAid will be up and running again when we get back from our October trip to the east coast. After rising for three hours, I divided the dough into two balls and put one on the stove to proof again and one in the refrigerator to proof overnight. I got impatient and decided to go ahead and start the baking process at 10:30pm (about an hour early).
The dough looked perfect when I set it on the peel, but somehow the semolina flour didn't get under one of the edges and it flopped onto the baking stone in this sort of amoeba shape. As you can see, my cuts in the top weren't deep enough either, so overall, the appearance is less than ideal. However, the taste was fantastic. I'm excited to try again today with the loaf in the fridge, but this time give it the proper amount of time to rise and maybe leave it on the sheet pan so it will retain its beautiful round shape.
September is almost over and I don't even know how that happened. It's not been Miles' best month, to put it mildly, he's been a bit of a tyrant through his cold, growing pains, and teething. There are some clues left behind from the rubble of Hurricane Little -- piles of clothes soiled with snot and drool, chewed up books, miscellaneous kitchen gadgets in various states of disrepair, and some dried up raisins and frittata ground into the carpet. Somehow in the chaos, I managed to start a couple of cooking and sewing projects on the weekend and in between naps, work, and fluctuating nanny schedules.
My first project involved breaking out my Bread Baker's Apprentice book and doing two things that I've been meaning to try for a while: pizza dough and sourdough bread. The pizza dough was a success. I made six dough crusts and froze them for later use. The other night we decided to give them a try and they were wonderfully delicate and stretchy and when coupled with my baking stone, we made pizza that rivals our favorite pizzeria. Dough win.


We went over to our friends' house on Saturday for an Easter party, which included a Peeps art contest and an egg hunt around the house for the kiddos. Little was a little to young to get the egg hunt part, but did a top-notch job of playing his part in our living art piece -- Peepzilla. He first picked off the Peeps lounging around on the landscape and moved on to banging on the buildings and swaying them around. It was a lot of fun. My contribution to the party (aside from the afternoon entertainment) was something that I've been aching to try -- a grapefruit tart. We have two bakeries in town that make their own versions of this seasonal treat, so after sampling both I decided to give it a try.


Tart Recap:
9 1/2" tart pan with removable bottom
1 recipe of Cooks Illustrated Sweet Pastry Dough
1 recipe of Cooks Illustrated Pastry Cream
4 grapefruit, peeled, segmented, and blotted dry
coarsely chopped pistachios for garnish (optional)
The Grand Central Bakery here in Portland is one of my favorite destinations in the spring and summertime. Before Miles came along, we would bike down to Sellwood, get a sack lunch, and have a picnic along the water. They make delicious bread and I always get the seasonal chicken salad sandwich with one of their oatmeal and golden raisin cookies. By the time the rain goes away for good and the sun comes out to stay, I think Miles will be old enough to ride along with us. Until then, I sometimes get a craving for their giant cookies. So, I was excited to see that the owner just published a baking book so I can try them at home. I quickly put it on my hold list at the library.
 Last night, while waiting for Miles to settle down for the night, I baked a batch of the oatmeal chocolate chip cookies. The baking book is great, because it reveals the techniques that make their cookies so unique. Apparently, part of the texture is achieved by creaming the butter and sugars for a good 5 minutes, until it lightens significantly and the sugar almost melts entirely into the butter. Also, it provided the exact weight to equal a ping pong sized ball of dough. For the first time ever, I didn't just eyeball the scoops, meticulously measuring out each on my electric scale. The other secret I learned in the book is to take the cookies out of the oven when the edges are golden, but he centers are still look under cooked. You then let them cool on the pan and they finish cooking. It gives the cookies that nice chew that I love so much! Brilliant!

 J and I always look forward to this time of year. The weather starts to get cooler, but is still sunny and the grocery store fills up with all kinds of delicious local apples. We thought about attending an apple tasting at a local nursery. However, J got his flu shot on Friday and M didn't have a very restful night, leaving us worried that he might be catching a cold. I'm pretty sure M is just fine (and his gurgling, snorting, and coughing were just quirky newborn noises), but we both decided that it would be a great weekend to just hang out in our pj's. Fortunately, our lounging didn't interfere with enjoying one of the season's greatest treats.


...and I'm off to Chicago for a nice long weekend. I never thought I'd escape to Illinois in April to get away from cold, rainy weather. Well, in truth, the nice weather is just an added bonus to the fact that I get to spend lots of quality time with my best friend, Lauren.
Today is going to be a busy day with work to finish up before heading out of town, a short paper to write, and of course packing. I guess I could have taken care of some of those things yesterday, but after class I took the afternoon off to run some errands. While out, I picked up a couple of new shirts and cardigans so I can wear an entirely different outfit (except for pants) every single day of my 4 day vacation. Having more than 3 shirts that fit feels very luxurious. How will I ever fit them all into my suitcase?
 After dinner, Jesse and I took a walk around the neighborhood and decided that cookies would be a nice evening snack. So, he got to work creating some of the tastiest oatmeal raisin cookies that I've had in a while. Yes, I even requested raisins (pregnancy really messes with the brain). There's no secret to the greatness of the cookies, it came from our favorite cookbook,The New Best Recipe by Cook's Illustrated. The only modification that Jesse made was to add raisins AND chocolate chips instead of just one or the other. Mind-blowing.
I tried to capture his creative process in action, but our camera has been acting up lately and this was the only photo that was somewhat decent. I'm sure it has nothing to do with the fact that it has one screw holding it together or that I dropped it on the floor the other afternoon and the lens got stuck open for a few minutes. I think it's time for another point and shoot. Any suggestions?
I always felt special growing up knowing that King Cake season always started on my birthday, January 6th. However, there are a lot of really bad King Cakes out there, so I rarely requested one as an actual birthday treat. Whenever I would go with my parents to visit my grandparents during Mardi Gras season I knew I was in for a treat -- I wasn't as interested in the King Cake as much as the candy, parades, beads, and doubloons. We'd inevitably go and visit relatives that were along one of the local parade routes and stand outside to catch our treasures. Of course, someone always had a King Cake and I would lurk around the kitchen and living room to see who got to keep the baby hidden inside.
I usually don't attempt to make King Cake myself, because if not done just right it can be a dry, tasteless loaf with cloyingly sweet (and tacky) icing on top. However, I just couldn't resist giving it a try in honor of the Saints making it to the Superbowl. Last year around this time, I tried a recipe that was very tasty, but didn't really look like a King Cake. The texture and feel wasn't exactly as I had remembered either. So, my mom sent over a recipe adapted from Emeril Lagasse that she really liked and I decided to give it a whirl. I generally turn my nose at Lagasse's recipes, since he isn't really from New Orleans, but in this case he did get the King Cake just right. If you've never had a taste before, I'd have to say it's closest to a slightly sweet dense bread with a pretty good hint of nutmeg. Very simple, but oh so tasty. Mine didn't bake up perfectly (notice the seam where the dough didn't rise together), but it was still beautiful. This recipe also has a hidden treat inside, a slightly sweet cream cheese mixture that keeps the dough really nice and moist. It seriously is one of the best King Cakes that I've tasted.
 The icing is lemon juice, milk, and powdered sugar that made a nice crust when it dried. As I hurried to ice the cake during commercial breaks in the fourth quarter, I realized that I probably shouldn't have put it on the cake stand until the end. Oh well, the drips are just part of the charm, I guess. And all of those little stars? Well, our grocery store didn't stock Mardi Gras colored sprinkles, so Jesse's contribution to the King Cake was painstakingly separating the gold, purple, and green sprinkles from two jars. Hey! He offered (and seemed actually excited about his accomplishment).
My only complaint? I personally think that it has a bit too much nutmeg, but that may just be my pregnancy nose/taste buds working overtime. Oh yeah, and it is really large! Next time if I make it just for two, I'll definitely try to cut the recipe in half.
 Unlike many of my good intentions the past few weeks (like blogging), I actually followed through with the apple cake. After a dinner of delicious red beans and rice, Jesse peeled and chopped the apples while I prepped the batter. It's a straightforward cake and seems to be pretty forgiving -- I've not made a bad one yet! Jesse's mom passed along the recipe a couple of years ago, but I'm not exactly sure which cookbook it came from. It lives in my recipe binder with a note at the top, "AWESOME!"
The ingredients are pretty basic, flour, sugar, butter, vanilla, cinnamon, and cream cheese. I think the cream cheese is what makes it extra delicious and dense. Oh, and of course the apples. The recipe calls for two, but I usually throw in an extra one, because I like my apple cake appley. The only problem? It bakes for an entire hour and fills the apartment with a delicious cake smell. It took all of our strength not to dig in 5 seconds after it came out of the oven. We waited 5 minutes instead and indulged in piping hot slices. Yum!
Jesse will be in San Francisco this week and weekend, so I'll have the cake all to myself! Don't worry though, I'm pretty sure he ate his fair share over breakfast this morning and will pack a cake snack for the quick plane ride down to California.
In honor of the cold weather, I fired up the oven for the first time in a very long time. With temperatures hovering in the 80s and 90s most of the summer, the appliance had been allowed a very long hibernation period. I will try to make up for the baking dry spell over the next few weeks. While Katie was here, I made bagels from the Bread Baker's Apprentice, which were just as successful as the first and second batches. Since I raved about the book so much when my parents were visiting, my Mom picked it up as a surprise one afternoon as she was browsing through Powell's. I plan on trying to make all of the recipes at some point.
 After dropping off my sister at the airport yesterday morning at 5am, I cracked open the book and got started on a batch of cinnamon rolls. They are probably the prettiest cinnamon buns that I've ever made and were very tasty. I started out with the basic recipe this time, but I think the next batch will include some dried fruit, orange zest, nuts, and honey. The whole process took about 5 hours, including mixing, proofing and baking. However, I learned that the initial steps can be done ahead and left in the refrigerator overnight before baking. I'll definitely take advantage of that next time!
I also made a batch of red beans and rice, which I thoroughly enjoyed for dinner last night (and breakfast this morning). After traveling and eating out for most of September, I'm excited to have time again to cook and experiment in the kitchen. I'm taking another class at PSU in Public Administration, which starts tonight. However, it only meets once a week, so I think it will be a lot more manageable than the summer course that demanded all of my time in July and August!
I've been a busy lady this week. We've had a guest in town since Friday, which meant that Thursday was spent tidying the apartment. I also cooked Jesse's birthday dinner and cake on what proved to be the hottest day of the summer yet. We had pesto pasta, fresh corn, and pan seared sausages. I think it was one of the best batches of pesto that I've made to date. Also, the overheated kitchen was totally worth the effort because the cake was delicious.
 Usually, Jesse requests a carrot cake or something chocolate. However, due to the heat we had quite a few overripe bananas sitting around. So, he thought a banana cake with dark chocolate frosting sounded divine (and so did I). That is until I found a recipe for Banana Layer Cake with Caramel Cream and Salted Pecans. I broke the news that his cake would not contain chocolate this year and he took it rather well after I let him taste the banana caramel sauce for the whipped cream.
Each layer of cake is dotted with lime and rum and the caramel banana cream is spread on top. The caramel cream is out of this world! I made two 9-inch cakes and sliced them horizontally. I only assembled three layers of the cake, because there are only two of us. We cut the fourth layer into dessert-sized pieces for later use with fresh berries and stored them in the freezer. Even after downsizing the cake, there is way too much leftover. We've been snacking on it since Friday and aren't even half-way finished. Good thing that it keeps getting better with age! I'm thinking next time, I'll cut the recipe by half and make them into cupcakes. MMM.
This week is going to be another busy one. I start my class today, which kicks off approximately four weeks of intensive study on Monday through Thursday. I can't wait!
Jesse and I got up around 7:30am today, because his cousin, Jeremiah, and his wife are coming into town. Naturally, we didn't really get inspired to clean the apartment until the very last minute. Also, I had delicious bagels resting in the fridge. I couldn't wait to get started (after my morning coffee kicked in).
 It is hard to capture boiling, steaming bagels in a photograph. Despite my best efforts, they all came out a little fuzzy. In case you're wondering, that's a 9-quart dutch oven. Those suckers are big!
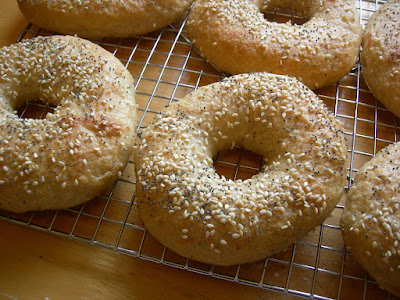 After boiling, Jesse expertly topped the bagels with poppy seeds, sesame seeds, and half with salt. Then, I put them in the oven for about 10-15 minutes to crisp up. They turned out to be exactly what I was going for when I first looked for bagel recipes -- New York deli style. They're shiny and crisp, yet chewy on the outside, and the inside is dense, moist, and perfect. They're not bready at all, unlike the other recipe I tried.
I truly feel that if they were a little more uniformly shaped, I could throw them in a nondescript brown paper bag and nobody would know that they didn't come from an authentic NY bagelry. Hands down, the Bread Baker's Apprentice nailed this recipe. I have a feeling that this book might be a keeper.
I spent most of the morning reading through the first few chapters of the Bread Baker's Apprentice that I checked out of the library last week. I love this book because it literally has 100 pages of reading material on the process of making bread before the recipes are even revealed. Sure, it may sound tedious (especially if you want to jump right in), but I thoroughly enjoyed learning about bread classifications and stages.
After my crash course on the mechanics of bread making, I decided to try the bagel recipe first. Since I had such success with my first batch of bagels, I thought I'd give them another try with a recipe that promises to produce a "bagel for the ages." In my mind, that's a tall order. I hope I don't mess it up! Apparently, the secret to making bagels that are so close to New York deli-style is the proofing overnight in the fridge. Personally, I like the idea of this recipe for no other reason than the fact that I can do a bulk of the dough work the day before I actually want to serve the bagels. This means that we could potentially eat them for breakfast instead of brunch.
 Around noon, I whipped together the first step: The Sponge. According to Peter Reinhart, the sponge is a wet pre-ferment that prolongs fermentation time, thereby necessitating a smaller amount of yeast and maximizing the grain flavor. The sponge for my bagels looks like a thick pancake batter. In about two hours, I should have a foamy, bubbly goop that has doubled in size. It's a little cool today, so I'm thinking that it may take a little longer, but who knows! This is an experiment.
Afternoon Update: The Dough
 Shortly after mixing up the sponge, Jesse and I headed out to a concert. I thought it was going to be finished by 3pm (just enough time for the 2-hour rise), but the band showed up late (naturally) and we didn't get in until 4:30. So, my sponge percolated for about 3.5 hours instead of 2, but it didn't seem to be a problem. Oops. After about 20 minutes of kneading, the dough was ready to form into rolls.
 With very tired arms, I used the technique to make dough rolls with the palm of my hand and it worked perfectly! Jesse helped out because my arms were literally approaching muscle failure. Who needs running when you make a batch of homemade bagels over the weekend?! Calorie burning with carbs. I love it.After rising for 20 minutes, I shaped the rolls into bagels and popped them in the fridge for their overnight rest. Stay tuned tomorrow for the final results....will they live up to our expectations? I certainly hope so!
Thursday morning we were up before the sun and on the way to the airport. This was the first time we've flown down to Santa Cruz in the morning and thought it would be a nice change. However, getting up at 3:30am for our 6:30am flight had the same effect as when we would fly all day across the country and arrive in California tired, grumpy, and jet-lagged. We dragged along most of the afternoon and then I finally relented and passed out for an extended nap. The rest of the weekend was awesome though (hence my lack of posting). I took my vacation time so seriously that I only took three photographs -- two at Daphne & Ben's wedding and one of Jesse's eye that became swollen and red from allergies on Sunday night. He's better now, but it was fun to joke that I had socked him in the eye, causing it to nearly swell shut.
 We saw lots of friends while we were in town, including Larson & Serena. It was great to catch up, especially since I haven't seen either of them since we found out that they are going to have a baby. Serena is an adorable pregnant lady with just a little bulge in front. We all marveled at her appetite, wondering how on earth such a small person could manage to eat so much! She must be doing something right, because she's healthy and happy and glowing. I finally got the chance to give them the baby quilt that has been sitting in the closet, taunting me for several weeks now.
 As for today, I'm planning on getting back into a normal routine again. I have a few errands to run and some new projects to plan. One of my favorite food blogs, Pinch My Salt, has embarked on a mission to bake every type of bread in the Bread Baker's Apprentice. I've been following the Bread Baker's Apprentice Challenge for a couple of weeks now. I picked up the book at the library, just to have a look, but I think I'm going to try a recipe or two before I have to return it. I'm particularly intrigued by the bagel recipe, which is slightly different than the one I tried a few weeks ago. I also would like to try the marbled rye. New baking projects will certainly mean a more regular blogging schedule again!


