Tuesday, May 17, 2016

Yard in Progress, Four Years Later


It's hard to believe we've been in the house now for four years. I've done a lot of couch sitting during my maternity leave nursing a charming little barnacle, which prompted me to revisit my blog. I'm shocked that it's been nearly three years since I posted to my blog -- okay not terribly shocked, but sad nonetheless that I've failed to document all the great projects around the house in any substantial way. During baby Yoda's nap this afternoon, I was admiring our garden and decided to take a few photos of our progress. 

Since 2013, we've added a number of plants, moved a number of plants, a drip system, and added at least 10 cubic yards of compost. As I mentioned three years ago, my goal was to eliminate all grass from the front yard, and we went even further and eliminated all grass from the parking strip. Now that the yard has matured and filled in, I spend most of my time pruning (although I've been neglecting pruning this past year due to a particularly rough pregnancy), weeding, and maintaining. You'll notice the Crocosmia is even taller, but it is no longer able to hide the flaming Dogwood bush that is now taller than J. The yarrow and salvia are still going strong with foxglove in the background. 
The side yard has also really changed since 2013. We've extended the strawberry bed up the driveway, and the irises have exploded even after thinning last fall. We planted two blueberry bushes (small ones up front) at the end of the season last year. They were pretty scruffy looking but have bushed out nicely this year. The biggest change of course is the dogwood tree. It's grown so much since the last post and keeps getting more beautiful. And the manzanita! It's huge now and desperately needs pruning. 

The space in front of our gate has also grown up quite a bit. We've added hosta, helebores, and fuscia that all thrive in the shade. Now that the rhododendron is finished blooming, I plan to thin out the branches so we can really see the sculptural shape of the branches again. 

Here's a glimpse at the two parking strips along our sidewalk. We eliminated the patchy crabgrass with lots and lots of digging and augmented the soil with tons of compost. I've had fun experimenting with plants in the strip that are relatively neglect tolerant and range from shade-loving to full sun. We've planted salvia, irises, native grasses, and euphorbia in the sunny spots, and helebores, huckleberries, and hosta in the shady parts in front of the house. 
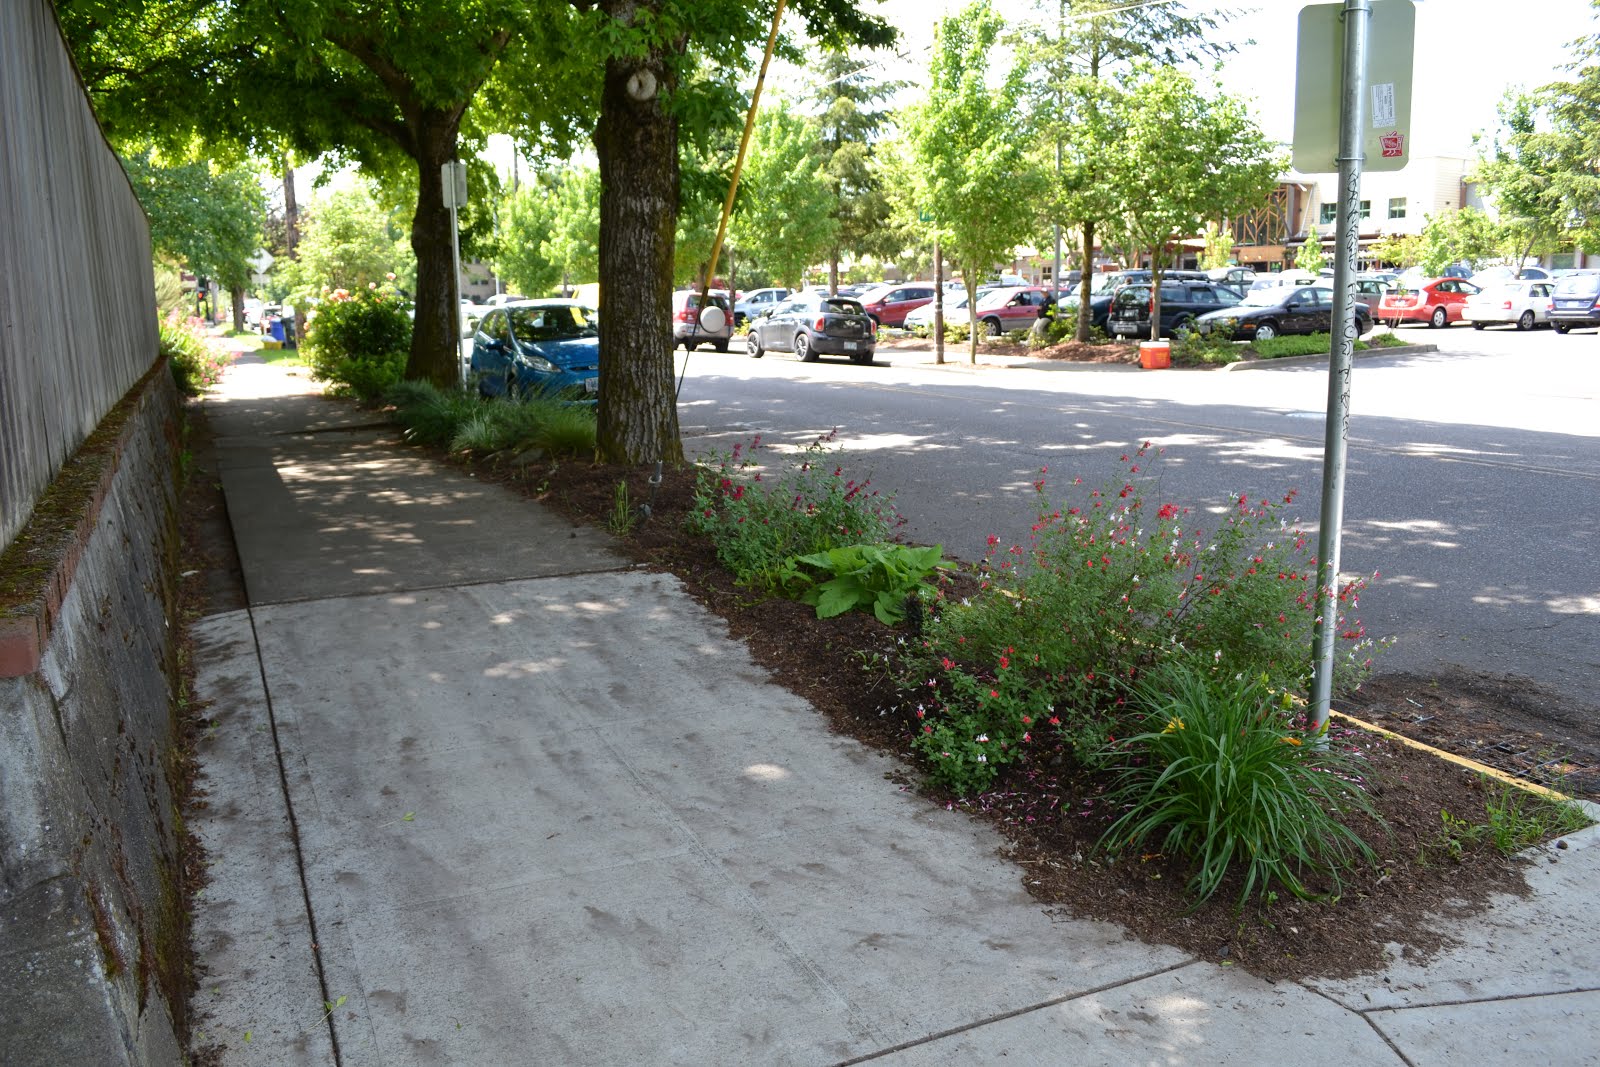
Last year we managed to get a no parking zone along the side of our house to leave a safe space for pedestrians to be seen at the crosswalk. It also meant that we didn't have to worry about making paths for walking to the sidewalk. I hope that the plantings will continue to mature into a nice green parking strip.  

This past year we spent a lot of time in the back yard. J figured out a great new way to string the hops, and we built a raised planter bed for edibles. That's material, however, for another post.  


Thursday, May 30, 2013

A Yard In Progress, One Year Later

May weather is crazy, ranging from dry summer to cold, grey winter. On the sunny days I spend as much time as possible outside in our garden. On the winter days, however, I spend a lot of time admiring the work that we put into our yard over the last year from the safety of our breakfast room window. We've transformed the space with lots of (stinky) compost, plants, sweat, and blood (but not too much). One of my big goals this year was to remove all grass from our front yard -- it's a pain in the ass to mow, and our yard varies the amount of water and light that it receives that the grass was always scraggly in spots and lush in others. This winter, for my birthday, we put in a much more useable stone path, which is enabling us to really plan out our garden space and take advantage of all it has to offer. Here's our progress from May 2012 to May 2013: 
Top: Front Yard in early June 2012             Bottom: Front Yard in late May 2013


Not all of the plants in the front yard were planted this year, they were added throughout the summer in 2012 and have matured into much larger plants. I spent a lot of time moving things around to accommodate their new size. New plants this year are the little red Salvia, the tiny pink and white English Daisies, small green Heather, and Foxglove to the right. You also can't really see two bushes that we added (because the Crocosmia are so big now), a flaming Dogwood bush with branches that turn bright red in the winter, and a Beauty Berry that will have beautiful purple berries through the fall. 


Top: Side yard in May 2013                   Bottom: Side yard in early May 2013
The side yard is one that took the longest to transform and the most work. Pretty much everything that was there in May 2012 no longer exists, except for the strawberries and the rose bush. The area was a haphazard mix of plants that were too big for the space (the juniper bushes and ornamental pear trees), and ones that were not suited for the hot sun that this space gets in the summer (the still unknown cabbage-y plant to the left). It took little effort to dislodge the trees, as they were poorly planted, and we eased our guilt by replacing them with a much more desirable dogwood tree, two sage bushes, 30+ additional strawberries, raspberries, irises, and daffodils.


Top: May 2012 Helebores and Black Mondo Grass  Bottom: Rhododendron and Fuchsia
I've spent the last year working on the garden space on either side of our front steps. It's a very shady space, so it's taken me a while to figure out the direction I want to go. The side nearest the fence was spent as a Rhododendron triage space, as we had a half-dozen very sickly plants that were put in all of the wrong spots around the house for staging. We've managed to give away five (and still have ten or twelve sprinkled around the yard). For this space, we picked one that has a nice sculptural form and all it wants for now is a nice big rock. It will take some time to pick out just the right one, but for now I'm looking into some lower-growing plants to fill the space -- the fuchsia is just a start. 

And finally, my latest project in the full elimination of all grass from the front of our house is the right-of-way space along the sidewalk. I spent a weekend digging up grass that was constantly shaggy and ugly to find that it was masking a crumbling curb. Oh well, working on finding stones to rebuild the gaps and make my new bed look a little more polished. In the middle is a Manzanita shrub, which is drought and heat tolerant, an evergreen, and has really beautiful sculptural branches when it matures. Around it are annuals that are also heat and drought lovers, which will be replaced eventually with perennials as soon as the Manzanita is large enough to not be completely hidden by larger flowering plants.

Wednesday, May 29, 2013

Goodbye Plastic (Okay Sort Of)

Don't worry, Mom, I'm not going cold turkey. It will be a gradual process that may take the rest of my productive years to perfect. However, when I think about the two tall kitchen bags of stuff that we produce every two weeks, I get a nagging feeling -- it's mostly non-recyclable plastic encased in plastic. Our two garbage bags produced every two weeks (or about 50 bags a year) is never going to go away (at least not in the next 400-1000 years). 

I feel very lucky that we live in Portland with its fantastic recycling and municipal composting programs. It is the only reason that we are able to only produce one garbage bag of stuff a week with three adults and a toddler in our household. But when it comes right down to it, recycling isn't enough and we need to shift our habits.

Before you close the browser and roll your eyes while muttering "damn hippie" under your breath, there are also reasons beyond the waste that we generate. The plastic toys that our children play with and the plastic encasing nearly all of the processed food that we eat leech chemicals. Some of these chemicals, like BPA, are known endocrine disruptors and others, like BPA "safe" replacements that are now used for baby bottles, etc., may be even worse. As I've learned, when I buy that BPA-free canned corn, I'm likely just getting an even higher dose of the stuff I am trying to avoid. Ugh. Talk about a total downer.

I started doing research a few months ago about how to start weaning myself off of plastics (and start making choices about which personal care products I use -- but that's an entirely different subject). I found a book, Plastic Free: How I Kicked the Plastic Habit and How You Can Too, that was exactly what I needed. I read it cover to cover and decided that I needed to start making a shift, not just for the environment, but for our health too. I'm not going to collect all of the plastic that I use each week and count the items, as I have neither the time or the inclination, but I now think about every single item that I purchase at the grocery store and whether its wrapping/box/container is recyclable or not. Realistically, I'm not going to eliminate plastic from our lives. It's not reasonable in today's world, and I'm not going to wear tin foil hats and live like a survivalist. However, I am determined to make a change and one that does not involve being all high and mighty about my "greenness."

Look at me, I'm a flawed being; our nuts/dried fruit/nut butter section of the cupboard is jammed with plastics. Clearly, I have a lot of work to do. Bulk bins, meet Brasilliant. Brasilliant, meet bulk bins. I have my cloth bulk sacks ready to go, but it is so hard to quit Trader Joe's prices and selection (shaking fist). I do feel very lucky that we literally live across the street from Whole Foods and a New Seasons Market is opening five blocks away by the end of the summer, both of which have great bulk selections. Paycheck meet your new home, Whole Foods. It's taken a while, but I've learned to make peace with the 15% increase in our grocery bills, because when it comes right down to it, if I have the choice to walk across the street or get in my car and drive, I'm going to walk every time. 

Wow, that was a long-winded way of saying that I'm going to try to stop using as much plastic. This is my attempt at holding myself accountable. I'm banking on it getting easier with time! It gets easier with time right? Right?

Friday, May 24, 2013

Building Fences

J and I have spent most of our free time and effort over the last year digging in our yard. I'm pretty convinced that it hadn't been gardened in over a decade, so most of the soil was hard-packed clay with layers and layers of plastic and junk. We started with our side yard, moved to the back yard, and then slowly made it to the front this spring. 

After planting raspberries this fall we realized that the pre-fabricated ugly fence panel separating our front and back yards was blocking the sun in a major way. Also, did I mention that it's ridiculously tall and ugly? At one time it was necessary to keep a dog from mauling other people and animals, but in our yard was not necessary. J and I had been talking about replacing the segment for months before we decided to just take it down a couple of weekends ago. First we thought of replacing it with another wood fence, but having the front yard open to the back changed the space for the better. So, we walked around our neighborhood, gathered ideas, and settled on a lower fence composed mostly of a metal mesh so that it turns nearly invisible. Our next task is to run a cable along the top of the posts to train vines.

Little was an eager helper when we were building the fence frame. Hammering everything but the fence was his specialty. We finally coaxed him from hammering dents in the garage siding to hammering scrap concrete that we dug out of the side yard. Behind Miles, you can see the supports for our pole beans and in the foreground, our happy rose and raspberries. 

More garden shots to come. It's amazing the difference a year makes. 

Monday, January 28, 2013

Little's New Shades

I started making roman shades for Little's bedroom about six months ago. They were prompted by the fact that the sun doesn't go down until 10pm in the summer and bedtime was getting increasingly hard. In a fit of desperation, I tacked a (temporary) blue blanket to the top of his window frame and there it remained for the summer, fall, and winter. 

The daily explosion of toys coupled with the blue blanket tied up in swags with kitchen twine gave Little's room the appearance of a shanty town -- squatters and all. Thankfully, my mom came to town earlier in January and helped me finish my roman shade project. She and I combined forces and cranked out the unfinished shades in a day and a half. 

Not only are they a great improvement over the blue blanket, but they were also incredibly cheap. I found the fabric at Fabric Depot for $5/yard -- the thermal backing and notions actually cost more than the main fabric on the front. The nautical theme is also quite relevant, given my sailors mouth trying to mount the damn things in the window frame. Here's a shot of the first shade hung next to the temporary blanket. 


And the finished product, which is Little and Mama approved. Next step is to finally hang some art and try to get the room looking like a space fit for a toddler, rather than a belligerent hobo (although some days the former greatly resembles the latter). More photos to come as we make progress!

Tuesday, August 7, 2012

Blueberries!

We went blueberry picking this past weekend in Canby, OR. The name of the orchard escapes me, but they allowed small children, which apparently is a hard thing to find. I can understand why, since Little ate his weight in blueberries, but come on, not allowing little kids? 

Anyway, we were directed to the Elliott bushes, since they're in peak season right now, but found that the berries were entirely too tart for anything but baking. Right next to the Elliott berries though were the Brigetta, which are probably the sweetest blueberries I've ever tasted. They didn't have an abundance of berries, but there were more than enough to fill our buckets (and snack as we picked).

Little happily helped hold the bucket, and picked quite a few for himself on the low hanging branches. Blueberries are great for picking because they're airy, don't have thorns, and grow berries high and low, so anyone can find as many as they need at eye or waist level. I don't think we realized just how many berries filled up each small plastic bucket and we spent about 2 hours picking with slow progress on filling them up. At one point, Little wandered off in the raspberries  and was found staring blankly at two old ladies that were clucking about his orange dinosaur shirt. They were very nice and waited there with him until his frantic mom was able to scoop him up and relocate him amongst the blueberries again.

We ended up with three buckets filled about 1/2-3/4 full, totaling about 18 pounds of berries. The fourth bucket was for Little, so he would stop poaching from our stash. He thought it was pretty cool that he got a "big one" all to himself. We were all hungry and stopped by Burgerville on the way home for their seasonal blackberry smoothies and a snack. 

We got back home, plopped the berries on the counter and wondered how the heck we were going to fit them all in the refrigerator. We pulled out all of the berry containers that we'd be saving for recycling and started stacking pints and pints of berries on the shelves. Last night, M made a blueberry kuchen, which was fantastic, and tonight we're going to take a stab at low-sugar blueberry jam (since the berries are so sweet on their own). The rest will be frozen for use in the winter when we're aching for a blueberry pie or crumble. 

I love that summer is finally in full swing and we're getting to enjoy the bounty. 

Sunday, July 29, 2012

Pork!

We were fortunate to find a great house, but even more lucky to move to a block with awesome neighbors who love food. Our latest adventure is with a professional size smoker that our neighbor received to review (he's a food writer who specializes in mixology). The smoker is big enough to comfortably fit about 60lbs of pork shoulder and the challenge was taken seriously -- three neighbors, three rubs, and three 20lb packages of pork shoulder. 

Each of us were in charge of making our own rub. We chose a chili chocolate concoction which was basically sugar, salt, onion and garlic powder, Chili 9000 from Penzey's, black pepper, chipotle powder, and some dark dutch processed coco. J set the alarm clock for 5:30am and the smoking began across the street promptly at 6am. We finished up about 6pm and all sampled the fare. It is fantastic. And now, a peek at deliciousness:

J applying the rub.

Ready for the refrigerator.

Removing the pork from the smoker after about 12 hours.


And this is what 60lbs of deliciousness looks like.

Sunday, July 15, 2012

Strawberry Jam

As part of our CSA in June, we got nine pints of incredibly ripe and delicious strawberries. Since there was no way that four of us could consume that many in a day or two, J and I decided to do our first canning project in the new house. We brought back a few Weck (pronounced veck) jars from our Santa Cruz trip and I picked up another case at a great little store in Sellwood, called Portland Homestead Supply Co. The jars are great for several reasons: they're good looking, all of the parts (including the gasket) are reusable, and there's not one trace of BPA or other plastics that are present on the disposable metal canning lids. The Germans have been using them since the turn of the 20th century, so that's a pretty good track record in my book. 

We initially we planned to do the canning process in just an evening, but then read the directions and found that it was a bit more involved than we thought. So, while watching a few episodes of one of our favorite shows, Archer, we stemmed and chopped strawberries and combined them with lemons and about equal parts sugar to sit overnight and macerate. Because strawberries do not have much pectin, they need some help to jell into jam, so the lemon rinds and seeds were reserved to cook with the mixture. 


The next night, we set out to make the jam and can it. You bring the berries up to a light boil and simmer for about 30 minutes until they reach 221º (the jell point) all while ladling off the copious amounts of foam that rises from the lemons, berries, and sugar rolling around. Apparently getting rid of the foam makes for a nice clear jam in the end. As the temperature got up to the 200ºs, I had J run out to the garage and get a work glove to protect my fingers from the steam. Yes, next time I will invest in a candy thermometer that just clips to the edge. 


After the jam made it to temperature, we took it off the stove and ladled the delicious mixture into our sterilized and prepped Weck jars. J's mom has a great canner that we used to process them in a hot water bath for 10 minutes, until they'd reached safe temperature. And here is the finished product, about 12 cute little jars of perfectly delicious strawberry jam.

Saturday, July 14, 2012

Back Yard Progress

It seems like we just planted the beds in our back yard, but after looking back at our weekend extravaganza in June, I realized that we've made a lot of progress in just a month. It's a completely new space that is so much more inviting than what what originally there:
East facing - Left: June 4th, 2012   Right: July 9, 2012


West facing - Left: June 4th, 2012    Right: July 9, 2012

Tomato plant progress - Left: June 4th, 2012     Right: July 9, 2012

Tuesday, June 5, 2012

The Great Flood of 2012

So the weekend before last (May 26th) Portland got an epic amount of rain in just a few minutes. I think it was record-breaking (ever) rain amounts for May and we got to experience it first-hand. Thunder, lightning, and seriously the most rain I've seen since our summers in DC. We watched it fall with bated breath, as our gutters shot out water like a fire hose and the street flooded with water. I'm not exaggerating when I say flood. 

The water quickly rose up over our bumper and stood still in the street long after the rain clouds passed. Emergency crews came out to assess the situation (thinking that they'd just unclog the storm drains) and scratched their heads when it wasn't debris causing the massive water build up. It receded by the morning, but our car had already been flooded. It was shocking, really. 


We moved the car into the driveway after the rain stopped, but it was too late. We had about 3 inches of water in our passenger side that wouldn't drain. J and I baled out as much water as we could, but given it was a Saturday night on a holiday weekend, all we could do was pull it in the garage, open the windows, and hope that the insurance claims adjuster was working on Monday. As we were soaking up the flood water our neighbor, Jim, pulled out his kayak to assess the damage. Beech was flooded for a couple of blocks, due to the deluge and the cistern's inability to drain with any speed. Welcome to the neighborhood!


On Tuesday, things with the insurance company were settled and we had our car towed to the body shop, since we drove it in bumper-deep water and were uncertain if water had gotten in places where it shouldn't be. Little was intrigued with the tow truck at first, but then it made our car go "upside down," which was quite distressing. He talked about it all day -- amazing how kids this young retain so much. 


We got the car back yesterday. Not only is it dried out, but its cleaner than it's ever been (since we've owned it). They detailed the thing inside and out. I commented to J after I pulled up in front that he left finger prints on the exterior trim. Seriously. It's that clean. The guy at the detail shop joked with me that the car might have a funny smell for a day or two, but assured me that it was just "the absence of smell". I assured him that I have no idea what that could even mean, given that I live with an almost two-year-old boy.

Super de-ionizers sucked out all of the funk we left (even before the flood) and magic elves picked out the Lara bar from the rear seats and the crumbs from the sick shift. It was like Christmas. I felt like if I were a hipper lady, I would have driven around with our windows down, blasting out the latest tunes that the young and beautiful listen to these days. 

Instead, I still rolled down the windows (on my way from Fred Meyer) while listening to political commentary on the Wisconsin recall elections while grasping a mini Snickers bar in my hand. As I pulled into the driveway, I could feel Robert Siegel giving me a tender nod as I tucked that Snickers mini bar wrapper in my purse instead of the map holder on the driver side door. 


Welcome back Mazda Protege 5. We promise to have your alignment checked and that ganky fog light changed out very soon.
 

Sunday, June 3, 2012

Front Yard Progress

Today we spent all of our time in the front yard digging, turning beds, moving rocks and dirt, and planting all of the 20+ perennials that we purchased to fill in the pretty blank canvass that was our yard. I'm sad that I wasn't better about taking "before" photos of our pruning and progress from when we first moved in, but I've tried to do a better job of documenting our progress. So here goes, just over one month of progress on the front yard:

March 14th, 2012, taken after our home inspection


June 3, 2012, taken before massive planting today


June 3, 2012, after planting a massive amount of perennials


Monday, May 7, 2012

Yard Work & Man Card

The weather was glorious last weekend, so we spent a lot of time in our yard. As we've found out from several sources, the house was a rental for a few years before we bought it, which explains the quickly landscaped back yard and the overgrown shrubs in the front yard. Our camellia, pieris, and vine maple were overgrown and puff-ball-like from several seasons of non-pruning (or pruning with a not-so-delicate hand with the hedge trimmer). 

J and I got out our tools, and equipped with pruning shears, a hack saw, and a bucket, we plucked and chopped away the dead limbs, and got rid of a lot of stuff that should have been cut back years ago. It's hard doing all of that work and still have your shrubs look wanting, but we realize that this is a process that could take years of care to correct. I'm okay with that, because they already look so much better. The bushy thing on the right side of the photo is our vine maple in the process of being trimmed up a bit. We also had a few volunteers here and there, one of which happened to be a tree growing nearly into our fence.  As you can see, J ripped out the tree with his bare hands and rightfully earned his "man card" for the weekend.

Little was thoroughly impressed with the feat of strength and despite his cast, proceeded to walk around the yard trying to lift things 10 times his size while saying "heeeaaavy" "heeeeavvvy" and grunting. The testosterone was palpable that Saturday afternoon. The green waste can was filled to the brim and we were all dirty and incredibly tired. 

I also tackled the side yard next to our driveway, which warrants an entire post to itself. It seems like it was just a trash pile for the various residents both recent and past. I turned up lots of glass, some bike parts, a bit of clothing, and two separate layers of landscaping plastic. I guess whenever things got too shitty, they just covered it in plastic and a bit of dirt to cultivate some moss and dandelions.

Next up? A lawnmower!

Wednesday, May 2, 2012

Home Repairs: Bathroom Tile

While my parents were in town, I put them to work. Dad installed a cable jack upstairs for our modem, changed out a dimmer switch that I hated, and read for hours and hours with Little while he convalesced from his slide accident. 

I swear some days the renovations to this house are held together merely with chewing gum -- a sort of booby trap that the previous owners rigged to get them through inspections, but would spring as soon as we used the appliances/plumbing/electricity in any meaningful way.

Anyway, whoever reworked the bathroom upstairs installed the shower liner (which is not my favorite, but hey, it works) without putting some sort of water proof material surrounding it -- no hardback board, no caulk, no tile, just drywall up against the shower head and top of shower liner. Brilliant. Since the liner is just 6 feet tall, we found out just a day or two after living in the house that the fine sprays and splashes would do some major damage to the surrounding drywall. After the first use, the outer layer of the drywall was starting to peel. 

I consulted with my tiling expert (mom) who assured me it would be a simple weekend project. We set out to get the supplies, and as planned, put her right to work. We found the tiles at a local place called the Rebuilding Center, which ended up costing $10 for the whole stack (about 200 tiles). If you're not familiar with the cost of ceramic tile, that was a fantastic deal (practically free). I failed to take "before" photos of our ugly shower, so you'll just have to trust me on this one. My mom got right to work putting up the tiles while I ran around trying to keep up with Little and actually get some work done. It took her about a day to put the tile up on the wall (there were quite a few little cuts to fit into the sloped ceiling). We ran out of time, so she left the grouting up to me (although with a guilty conscience, since I'd never done it before). 


After watching her do the basic motions, and reading the back of the grouting tub, I got to work. It took a couple of hours, I think, and the grout was complete. Not a terribly complex task, but draining nonetheless. I can't imagine doing a much larger space, but I guess if the work didn't involve reaching over my head for hours at a time, it wouldn't be nearly as bad. The shower actually looks pretty respectable now and we can rest assured that we won't be doing any further damage to the walls. The next step will be to find a more suitable shower head (one that actually enables you to adjust the settings) and we'll be set. 

A more spendy project down the road would be to actually replace the shower doors with more attractive frameless glass, but there are so many more projects around the house that take priority, like insulating the attic, adding soffit vents, extending the gas line to the kitchen so we can get rid of our sucky electric range, and oh yeah, paying the mortgage. 

I'm not complaining though, the house is fantastic in spite of its former owners, and I'm looking forward to a summer full of projects, both inside and out.  

Cost: About $100 with tile, grout, the menagerie of tools needed to apply adhesive, grout, and cut the tiles.
Time: About 2 1/2 days of working hours to place tile, grout, and caulk the seams. And another week of curing. Pretty simple and cheap compared to hiring a professional.

Thursday, April 26, 2012

Home Repairs: Refrigerator Edition

We closed on the house two weeks ago to the day. It hardly seems possible, but we did. Moving with a toddler proved to be more hectic than I could have ever imagined. Thankfully, the weather was nice and we had a group of great friends to help us last weekend. 

It became clear that while our house was in great condition, there were a lot of little things that needed to be taken care of right away. One of the first repairs on the list was the refrigerator. While it functions well enough (although not my choice of style), the freezer was having some major problems that we learned about upon moving in. The freezer door is equipped with an ice and water dispenser that was somehow broken and causing the freezer to fill up with frost. When I looked into it further, I realized that the little flap that is supposed to stay closed until you press the lever for ice was not closing properly, thus letting warm air creep into the door and frost over. Not only was it frosting up the freezer, whenever we would hit the lever for the ice, it would just back up in the door and create a melty ice dam at the opening. It was a mess.

The only solution, I thought, was to take apart the door from the inside (with about a billion bolts). However, I decided to Google the problem and found awesome YouTube videos on how to repair GE refrigerators. I soon learned that it is easy to fix the gizmos on the ice dispensers by simply prying off the front digital panel and unhooking some wires (after you unplug the refrigerator of course). 

Thanks to the videos online, I quickly learned that it was not the flap that needed replacing, but the solenoid (whatever that is). I'm still not entirely sure how this little device makes the door flap open, but I guess that doesn't matter as long as it fixed our frost problem. After pulling out the panel, taking out a few tiny rusty screws, I had reached the problem -- the dastardly solenoid that had given up all hope of opening our ice dispenser flap. Now looking at this photo, it has become clear to me that my next project as a home owner should be to get a damn haircut. Geez.

For reference, this is a solenoid. The one on the left is the replacement and the one on the right is the sad sad pile of rusted-out metal that stood between me and my crushed ice water. I'm not exactly sure the kind of neglect it takes for a part that's buried behind two layers of plastic and barely encounters fresh air to completely corrode, but there you have it. I hooked up the new wires, screwed the panel shut, and the freezer and ice dispenser seem to be back in working order. 

Cost: $41 for the new solenoid

Time: About 15 minutes of my time. Home ownership feels good this week.